Monday 30 January 2017

C17 Globemaster III build - love on an elevator(s)

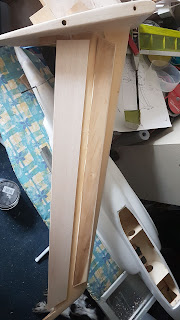
As previously mentioned, I had spoken to Phil Cooke about the suitability of the C17 elevators that I had cut form the foam tail, and that I had doubts on their size.  So, I set about modifying the tailplane and making new elevators to get some authority back in the tail

Here you can see the older elevator (darker version) and the new proposed one.


Again, old one is darker.  New one is getting built up:


Hinge and horn blocks added :


Top skin added :


Root modified to match longer chord of the elevators :


Second elevator built and top skin on too :


I also spent some time prepping the Fouga parts with primer, and should be hand painting the pilots this week.  Once that's done, she'll be a lot closer to receiving her top coat.  Happy days!


Tuesday 24 January 2017

C17 Globemaster III build - forward fuselage nearing completion

I have now brown papered the forward fuselage foam.  It was my first time doing this, and it seemed to go well enough.  The paper shrinks as it dries, and once dry, the seams are all sand-able.


Vulcan sunset print in the background :)

I drew the cockpit windows back on, and she is pretty much ready for glass now.  There is a bit more filler to do around the UC pods, but that should be a quick job.


Tuesday 17 January 2017

C17 Globemaster III build - first UC pod complete

A little light sanding and a quick skim of filler, and we're there :


Top side :


Now onto the port pod - I've nearly finished up the back of the port pod actually, I'm just lacking photos.  More to follow!

Monday 16 January 2017

C17 Globemaster III build - undercarriage pods continued

With the front of the starboard UC pod being finished, it's time to look at the rear of the same.  These blend in much more sharply than the front, but unfortunately have to bridge the fuselage split line.  Not ideal, but it may give me a hard point for launching, as the CofG should be right back here.

Firstly, bandsaw out a profile from 1" thick balsa block, attach to the fuselage, then glue on stringers to create a bird cage :


Secondly, start planking one side up to the top, then around to the other side :


Close to closing up, just the extra thick cross-gran balsa to attach here, that forms the on-ground running surface :


First section all planked in and dry :


Friday 13 January 2017

A little bit of everything - Fouga, C17 & Valkyrie

The final few parts of the C17 nose shaping and planking were becoming too much like hard work, so I moved over to do a bit more work on the Fouga and Valkyrie.  Truth be told, I was a bit stuck in forming the last parts of the undercarriage pods, so I always find it helps to have another build or two to distract you.

I have now painted the cockpit wooden parts in two thick layers of floor varnish, so it should now be ready for primer at the weekend :


Then as I knew there was some P38 filler required on the rear end of the Fouga's fuselage, I mixed up extra to get rid of a couple of dings on the Valkyrie fuselage.  These dings were actually caused by me pushing on the fuselage when trying to remove an alloy spar rod that had "picked up" and locked itself into the alloy fuselage tube.  Oops!  This has since been remedied by a heavy steel version, and a lighter carbon one too.


Then I had a brainwave!  Small, cross-grained sheets could be patched into that pain of a pod on the C17.  1 hour later, I had the nasty niggle nullified.  Here it all is in it's rough-hewn glory, before sanding or filler :


Monday 9 January 2017

Valkyrie repairs & modifications

I have the opportunity coming up to fly some gliders on a couple of (new to me) slopes, and rather than risk a PSS machine on a hill I am not familiar with, I thought I'd get and kill off a few repairs on aircraft that have been sat around too long waiting for attention.

First up is the Valkyrie - a 100" canard I built in the 2011 / 2012 winter from the RCMW plan.  The main problem with this (and most canards) is the fore-plane is susceptible to being snagged in the grass when landing, and this causes the nose to snap on this particular model.  I think it's had about 5 repairs so far!


So, the nose has been epoxied back together, and I have decided to manufacture this little skid from about 8 layers of 1/64" ply, bent around the wood screws on this jig.  Once touching down, this should give the nose the necessary clearance to keep out of the weeds.


And this is where it fits.  Or should.  I drilled 3 holes through the flat area, mounted it on the fuselage, and smugly bounced the nose up and down on the bench to test it..BOING BOING CRACK.

Balls.

It had broken through one of the drilled mounting holes.  OK, version two coming up with carbon cloth laminated between some ply!


Tuesday 3 January 2017

2017 is here - and some flying reports.

Well, it's been a while since I've posted, so happy New Year to you all!

We managed to get flying in on the 31st of December, as well as the 1st of January, which seems to have become a bit of a custom for me over the past 4 or 5 years.

New Year's Eve we were at the Great Orme, in a fantastic SW blow, coming straight into the big bowl peaking at 62mph on the edge, but staying above 40 all day.  Needless to say, this gave ballistic performance for all the airframes present, in what turned out to be not so much of a cold wind.

John Hey's A4 dumping its tanks before landing
Most of the PSS aircraft were having some penetration problems, but the Me262 did what it loves to do in these conditions, and pushed out with great confidence and nary a wobble from launch even in the compression zone.  The Hawk struggled a little, but then she is only just over a pound in weight.

Flanker with wonky taileron - photo courtesy Dave Gilder

The Flanker put in the best performance of her career, and I got her properly trimmed out at long last.  I had about 20 minutes out of her before one of the tailerons became a bit too wobbly on it's horn, so I made a landing with nearly crossed-controls and thankfully no damage at all.  I've already re-secured the grub screw and cyano'ed it's threads a little to stop a re-occurrence.

Amazing views over the bay - photo courtesy Dave Gilder

We stayed overnight in one of our favourite local wild camping spots to see the new year in.  As usual we were both asleep by 11pm!  We've never been ones to care much about the date change anyway, but we watched a few firework displays out the window that woke us up.

On the 1st we flew The Cloud near Bosley, which was much colder.  I flew the Hawk again but preferred the sport stuff here as inland slopes just cannot match the smoothness or power of a coastal site. The light got gradually better through the day, but the temps dropped, I believe!

These dozen or more flights over two days were the first time I'd used the Horus, too.  I fly it with a chest rig that I got as a Christmas present (thanks Mum!) and it is very comfortable to use like this, and you can easily launch with both hands without the TX moving about, too.  Great for the bigger stuff!

Back to work now, and thankfully back in the workshop too.  Here's to more flying in 2017!