Showing posts with label balsa build. Show all posts

Monday, 16 January 2017

C17 Globemaster III build - undercarriage pods continued

With the front of the starboard UC pod being finished, it's time to look at the rear of the same.  These blend in much more sharply than the front, but unfortunately have to bridge the fuselage split line.  Not ideal, but it may give me a hard point for launching, as the CofG should be right back here.

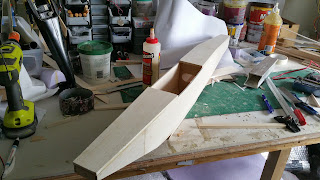
Firstly, bandsaw out a profile from 1" thick balsa block, attach to the fuselage, then glue on stringers to create a bird cage :


Secondly, start planking one side up to the top, then around to the other side :


Close to closing up, just the extra thick cross-gran balsa to attach here, that forms the on-ground running surface :


First section all planked in and dry :


Tuesday, 4 October 2016

Design study - Ilyushin Il-102

From Wikipedia :

"The Ilyushin Il-102 was an experimental jet-powered ground-attack aircraft designed by Ilyushin. This aircraft was never chosen for production, being surpassed by the Su-25, and only a few development prototypes were built."

The IL-102 is a form of "shturmovik", or ground-attack aircaft, the type of which Russia was renown for producing in the Second World War (see IL-02), but this one only got as far as two prototypes.  So then - a few pictures :


Look how UGLY it is!  Brilliant.  And now a 3-view :


Broad wings, nice proportions, boxy fuselage that should go together quickly, right?  Even the cockpit is the same front and rear, just slightly cut-down to match the curve in the rear deck.  Oh yes - a rear cockpit for a rear turret - novel!


How could it be made?  An easy balsa fuselage with thick balsa top and bottom to get the curves; blue foam engines with balsa block front and back; and a foam wing with an inset spruce spar, top and bottom.

Here's some sketches : 

Roughly 1100mm wing span produces a 1000mm length, or thereabouts.  No need to change from a scale wing - its plenty broad enough.  A 3lb weight would produce a wing loading of around 15oz/sq. ft, which is quite a nice figure, but she's more likely to hit 4 pounds I'd say.

So..wouldn't it be a shame if I...

..WENT AND BUILT IT?!


2 hour's worth of work last night, and she's coming along well.


Thursday, 8 September 2016

Micro PSS - X4AD complete

I finished this little monster up last night at about midnight, in between bits of Albatross work.


I've built her from a Jetex plan that I found on Outerzone - a great resource for plan builders.  The shape of the XA4D was a little different from the production variants, being a prototype and all, and I quite like the polished alloy effect.

Maiden on Saturday hopefully!

Monday, 8 August 2016

L39 Albatross progress - final paint done


I haven't posted about this wee bugger for a time now, mainly because I've just been getting on and finishing it off.  So here are some updates!  I've gone for a vaguely Russian "aggressor" type scheme, which I think always look nicer without hard edges.  I rattle-can finished the base colour of "appliance white" over my typical silver HK film / Prymol / plastic primer base.

Ready for some colour

First blue on

Second blue on. Done!

Cockpit masking seems to have worked OK, which is nice.  I've spent this morning sorting out aileron crank clearances (which is always a pain in these), and getting the servo installs done.

I've got a couple of touch-ups to do on the paint front, add the decals, maybe some panel lines, a quick C of G tweak and it's done.


Thursday, 14 July 2016

C17 progress - it lives!

I originally scrapped the rear fuselage, as the blocking out of foam was not going well.  Too many formers made too many joints in the foam, which used more glue and more shims squaring things up.  I hated it.


So she looked like that a few months ago, and was ready for the bin.

After speaking to Mark Kettle a bit over some PSSA meets, I decided to strip the formers out the middle, and just use 4 longerons (one in each corner) to push a foam "box" up against.  This could then be hot wired and sanded to shape.

Like this :


Then some rough shaping : 


Tail on, in the house!  OK, she's still big then.  Oh, and you can see some more fuselage shaping :


So my worries of the fuselage have pretty much gone away (until I get to the nose section), so I started to work on the wings again.  I was going to use the first panel as a test, but I think it's tidied up quite well and so will use it on the final model :


That's the wing LE and TE being shaped...with a power planer!  They are quite hard 3/4" x 1/2" spruce, so take some work to get right.


This is why I was going to scrap this wing - you can see ripples in the veneer.  This is how the sheets were supplied, and I should have rejected them and got them sent back straight away, but I thought I could get rid of the problems in the press as the veneer went on.  I was wrong.  I have locally re-glued under the bubbles, and am blending it here with lightweight filler.  The spar box and also full-depth ply shear web are now in on this shot too.

So back to to the tail - I re-veneered a part of this in balsa (yes a bit of a mish-mash, but it'll work fine) and set out the servo positions for the rudders.  


I have used some 1/4" square balsa on the edges of the fin for a hinge shroud.  

Will it be finished this year?  Not sure, but I hope it would be ready for the last meet this year.


Thursday, 16 June 2016

Hawker Seahawk progress - Planking

I'm really getting in the groove again on the Seahawk, and enjoying the planking again.  Progress has been swift and I've been marking the plan up with improvements as I go, because I'd like to make a second with removable wings at some point.

From this..

To this...

..And a bit more of this!
I'm off to Weston Park model show on Saturday, so will look at picking up some bits and pieces for her - mainly some more balsa but there isn't a great deal to go on now.  Can't wait to get this one flying!  Which reminds me, I need to look at colour schemes again and make a final decision.

Wednesday, 8 June 2016

Vulcan progress - paint disaster! & PSS forecast

Well it was all going so well, until this :

In my haste to get her finished, I used the cheapo masking tape to back up the blue vinyl tape.  I thought that the cheap stuff would need some extra persuasion to stick, so used a seam roller to flatten it all down before paint.  Now, this is a method I have used before  on masking, but not with acrylic paint - usually when using 2K or enamels, which bond a LOT better than the water based stuff.

So, not only did the cheap stuff fetch the paint off, the vinyl did too - right down to the Oracover.  Balls.  So you can see I have started re-applying blue vinyl on the green now, and I will pick up some more Frog tape "yellow" tonight.  I have to go into town anyway to get the satin varnish, but it's something I'd rather not have to do.  Live and learn!

So the weather, then.  At the beginning of the week, it looked good enough to fly everything in the fleet this weekend.  Now - it's turned crap.  No wind, plenty of rain.  Balls.  Rhossili is looking fine with a handy SW  / W that should be good enough to get the Vulcan away, so I will leave it until Thursday night then decide where to go.

Tuesday, 7 June 2016

Vulcan progress - nose and intakes, plus PSSA

Just a quick snap from lunchtime showing the decals on the nose and canopy, plus the intakes are now painted black.  She really is getting there.  Today my order of blue vinyl masking tape arrived, so I should be able to finish the wings tonight, after another masking marathon.


This weekend's PSSA meet on the big rock looks like it should be good - some strong SW and W wind coming through, with Sunday looking the better day for the big stuff, which will make the CSA guys happy I'm sure.

Also, Monday looks brilliant (again) - luckily I have booked it off (again)! 3 days of sloping on the rock - can't be beaten.

Monday, 6 June 2016

Vulcan progress - decals and tailpipes

I ordered these as a custom job from a chap on eBay - all for £9!  I have the nose-art ones too which I'll post tomorrow.  Looks great!


My worries about the tailpipe manufacture and fitment are over too, I think.  Empty dry yeast containers to the rescue :


A perfect fit!  I'll cut these down and prime them ready for some silver spray tonight.  That was easy :)

Vulcan progress - the paint goes on

XL360 is now getting her colour.  The underside has been done in the lovely light RAF grey that I colour matched to the real XL360 in Coventry, and that has been masked off.
A Vulcan in grey primer

All masked up underneath

Then it was on to the top surfaces.


The light grey is what has been sprayed.  This is the general pattern that I then masked off, ready for the green.

Then the green gets sprayed on.


Then we pray that the masking did its job..it did!  There were a couple of blemishes from the blue vinyl tape, where it lifted not only the grey but the primer too.  Oops!  This was easily remedied with a small brush, however.

Getting close...
I've run out of blue vinyl tape (already ordered and on it's way), so on to the bottom of the wings with some controls system sorting.


All done.  4 metal geared, high speed mini servos (Coronas - my favourite), and some M2 linkage hardware makes this part complete.  I need to spray the hatch covers the correct colour at some point too, of course.

Nearly there!


Tuesday, 31 May 2016

Vulcan progress - covering & cockpit

The big (72") Vulcan is coming along well at the moment, with a bit of a push underway for her to make the June PSSA meet at the Great Orme.  This weekend I dabbled a little with the covering, finishing off the fuselage as I had sorted the wings and flying surface already.

So, onto the cockpit then, as I never managed to get hold of an original from the supplier unfortunately.  Out with the pink foam, and using the 1/72nd scale model as well as the plan, I knocked one up.  Here it is on the Vulcan, freshly stuck down :


I peeled the Oracover away under the foam to expose the balsa first of course.  Next stage is to glass this with light cloth and WBPU :


Getting there!   It looks messy at this stage, but the cloth will be cut back shortly.  I have filled the weave with a WBPU / talcum powder mix to thicken it all up.  This should be set tonight ready for a light sand and final coat.  Then its on with the P38 body filler and she will be ready for priming.


Tuesday, 3 May 2016

L59 builds continue

It's been a while since the Albatrosses appeared here, mainly as it's a build I've done the before so not a lot of it is interesting.  Here are a few pics though of recent developments that I've not done before - cockpit moulding.

I made a form from medium balsa, and sanded it fairly smooth.  I didn't go balls-out and fill / sand / prime / sand, as I just wanted to see what it would do with a Cooke bottle.  It went really well!  The flat front windscreen part came through very nicely, and no "graining" or whatever came through in the plastic.


As a first try, I am very happy.  The bottle was old and manky; I didnt remove the glue first, and I scorched the plastic near the front as the blocks moved from the bottom that hold the tension on the bottle.  I followed a how-to that was in RCM&E recently, and that I had also seen on RCG I believe, so it's great to try out and means I'm not afraid of cockpit creation any more!

Monday, 2 May 2016

Sukhoi Su-27 Flanker for PSS - maiden done!

On the 30th I joined up with a few of the south Wales fliers on the Ice Scream slope in the Bwlch range of hills above Treorchy for some slope flying.  The wind was NW ish, but it would gust with more W in it temporarily, giving us lots of turbulent air and not much lift.

Anyway, the Flanker got away ok in the end, after scratching out some lift she went well.  I struggled with my TX a bit, as it seems the up elevator trim switch is not working - I know this is a common fault with the 10C unfortunately, but not a big problem as I will swap it for the elevator trim switch internally.  This gave me no real feel for the planes performance in turns, as I was flying the elevator all the time I could have been close to the stall.

Enough chat, here's a video from Steve Haughton.


And a few stills from Tom May :


Some finer tuning I hope at the May PSSA meet on the same range of hills.