
Thursday, 27 August 2015
B36 musings
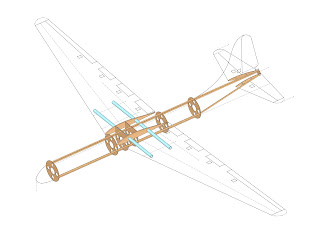
1/16th scale doesn't sound very big, right? Well, here I have drawn up my B36 to 1/16th scale - only 4.2 metres of wingspan! Just had a quote through for the foam wings to be cut professionally, so will see how I go from here.
Wednesday, 26 August 2015
Migration!
My old domain that I've had a for a fair few years now points here too -
www.warp-core.com
Yay!
www.warp-core.com
Yay!
Tuesday, 25 August 2015
Futaba 10C > 9C?
I bought a second-hand Futaba 10C off of James, the chap I bought the BUFF from. More programming options and flight modes make me happy, as does a better screen with a backlight. Not so happy with the cheaper feel of the plastics and side VR's - hopefully I'll grow to like it? All programmes sent over to the 10C via a Spartan CAMPAC now, so we will see. The 9C won't be sold just yet.


B52 mods part 2
I have glued up the pylons, and prepped the wings. Last night a splurged a lot of body filler onto the tops of the pylons, then pinned them to their respective places on the wings. I protected the wings with tape first to make sure they don't stick. Hey presto! Exact match for the wings. Now to add magnets, then it's all ready for touch-up covering.


A10 now in paint
Nearly all the repairs done, but realised I will have to look over all control horns and hinges after the pancaking - there's just too much to risk with a big 'plane, and I've found one of the elevator horns loose in it's mounting now too.


Anyway, some (poor) painting pics. Quite close now :


I've got to re-draw some panel lines, and re-do the weathering in places, but it's all moving in the right direction.
Thursday, 20 August 2015
B52 pictures
Talking of the BUFF, I thought I'd upload these lovely pictures from Phil Cooke that he took at the recent PSSA Meet.


Awesome :) Cheers Phil!


Awesome :) Cheers Phil!
B52 mods
Only one weekend's flying and I got bored / frustrated with the horrible knock-off-pod design. All credit to the builder of the airframe, but there's only so far you can go with a pin in a balsa structure. Any side-ways load just pulls the pylon apart, and you only want to be sticking those fecking things back on so many times in the field!
So, to my solution. Remove all traces of the pylons from the wing, and glue those bits to the engine side of the pylon. Embed strong magnets into wing and top of pylon (3 each side, 6 per engine), and that's it. I need to get some of the lovely chrome / brushed aluminium covering to finish the pylons off, but hopefully you get the idea :

So, to my solution. Remove all traces of the pylons from the wing, and glue those bits to the engine side of the pylon. Embed strong magnets into wing and top of pylon (3 each side, 6 per engine), and that's it. I need to get some of the lovely chrome / brushed aluminium covering to finish the pylons off, but hopefully you get the idea :

3D printed parts
Here is a 3D printed dummy engine that I have done for a customer. The cylinders are a match for his flat-twin DLE engine, so making it look like an 8 cylinder radial (yes, I know they don't exist!).


They will be mounted to an engine cooling baffle within the cowl, so they are just the front sections only. Should like nice!
Horten nearing the end
The Horten has now come back inside for the PU varnish to set fully, and a few last odds and sods. Launch handle recess cut into bottom skin; radio access hatch finalized and some Rx mounting hardware added within. Next stop, covering! EDIT - got a picture now :


Wednesday, 19 August 2015
Horten nearly ready for covering
Here is the Horten this morning, sat in the garage after getting it's second coat of PU varnish on the glassed foam parts. Crap pics in the messy garage I'm afraid!


Tuesday, 18 August 2015
A10 & Horten
Well, I don't know where I pulled 40 hours from for the A10 repair, as it's only been 12 hours and all mechanical repairs are done. Just doing the first coats of paint on the tail now. Here's the tail before paint, all filling and spot filler done :
 The Horten is coming along nicely, as it has just had the pink foam parts glassed. A quick final rub down then the covering can start.

Saturday, 15 August 2015
A10 repairs part 5
So the front mounting for the tailplane (where the dowels go) gave way in the pancaking.

I decided to re-attach it a different way to how it was originally mounted. Why not make use of my large carbon fibre boom?
I made these hooks (3 in total) from liteply:


I decided to re-attach it a different way to how it was originally mounted. Why not make use of my large carbon fibre boom?
I made these hooks (3 in total) from liteply:

That, when laminated together, were epoxied to the back of the dowel plate, which in turn encased the carbon boom :

Left overnight to dry, cracks were Tite-Bonded, then filled with epoxy this morning. A little bit of the red spot filler, and a quick test fit. Job done.

Friday, 14 August 2015
A10 repairs part 4
Here is the promised picture of the tailplane repairs. Not far off from being in a flyable state again now :

And the filler in the nose - will need a bit of dentistry to make her look angry again!


And the filler in the nose - will need a bit of dentistry to make her look angry again!

A10 repairs part 3, and build musings.
Well, the tailplane feels really strong now. I've re-glued a wobbly fin, and sanded down the big ply web to the tail surface, and it feels very sturdy. A bit of filler tonight, and the tail will be ready for priming at the weekend - after I've re-attached a loose elevator. Pictures to follow later!
So - the autumn / winter builds then. I've decided on this :
So - the autumn / winter builds then. I've decided on this :
- Finish the Horten (just requires final sanding and covering / painting)
- Finish the B24 (wings to cut, fus to finish)
- Hawker Sea Hawk build (x2 ...more about that later)
- Andy Conway Su27
In amongst those are a couple of little builds and renovations - a Flair Hawker Hunter that needs tweaking then selling; a Howard Metcalfe F4 Phantom that needs some decals; a P51B that needs some slope-suitable wings cutting for it, then covering.
Thursday, 13 August 2015
A10 repairs part 2
The slot was cut out fully at lunch time, and the brace them smothered in Gorilla Glue, and pushed in. No doubt when I get home, this is going to be a rather foamy mess, but at least it would have bonded!


Here is the tray in the nose. I have a bit of a repair to do on the old side walls, but this is all dry now and pretty solid. Just some hardware to add now for tying the battery and ballast to the airframe, then it's ready for paint.

A10 repairs progress
Gun cover and gun tube re-installed. Looks like I have some work cut out for me here when it comes to using the body filler! Oh, and the big dent in the side of the nose now filled too.

Top of nose section rear former now epoxied back in. I did a lot of work in there to strengthen it - the 1/4" birch ply plate is now secured to the next former forward (F4 I think?), then the top half of the former is webbed with 1/4" birch ply triangles to *hopefully* stop it being pulled out again.

Tailplane halves now re-joined, and a slot has started to be chased out to insert the new full depth 1/4" ply brace. Yes there are two slots. The one on the left was a schoolboy error by me - I marked the spar location and started cutting that, rather than off setting from the mark and cutting.

Inside the nose section, with the debris removed. I have now planked / boxed this in medium-hardness 1/4" balsa, with the bottom of the box secured to the carbon tube.

More to follow!
Wednesday, 12 August 2015
A10 quickie..
The Hog *might* get a small mention and a photo in RCM&E sometime soon - I have submitted a photo and some text. I asked Phil Cooke for some of his photos from the 2nd Orme meet - this is what I sent off for submission to the magazine.


Will see what happens!
Too many projects...arrrgghhh!
After another successful PSSA meet at the Lleyn Peninsula, I find another aircraft I want to build - the Folland Gnat by Alan Hulme. Steve McLaren has a lovely example that flies nicely and is finished ever so nicely - but for me it's building one of Alan's aircraft for the 2016 season that is important, what with it being the 30th anniversary and all.
So..that brings the total builds in progress / ready to start to :
So..that brings the total builds in progress / ready to start to :
- Folland / Hawker Gnat (Hulme design)
- Sukhoi T50 (my own design - plans printed, ready to start)
- Hawker Sea Hawk (my own design, again plans printed, ready to start)
- 1/6th scale Me262 (own design, lost foam fus.)
- 1/12th scale Consolidated B24 (own design, halfway through build)
- 4m+ wing span B36 (own design, sketches complete, plans ready to be drawn)
- A4 Skyhawk (mass build..might build this, not sure as yet)
- Sukhoi Su-27 Flanker (plans and parts here, from Andy Conway plan)
So I need to look at this sensibly, and trim out what I don't want for 2016. Ugh, this is going to be hard!
Tuesday, 11 August 2015
A10 first "flight"
Well, I took the big girl to the Lleyn, and on Sunday I decided it was maiden time, into the teeth of a blustery squall.
It didn't get away. 4 brave souls chucked her aloft for me (great launch guys, thanks!) but alas, she stayed level for a wee while then pancaked the ridge line. I was feeding in up elevator at the time, but it seems just not enough quick enough. All-in-all though, I think it could have been a lot worse if she'd pushed out a bit then pancaked further down.
Damage list as follows :
- tailplane snapped in half, starboard fin dislodged
- tailplane mount (dowel plate) dislodged, bracing former cracked
- various splits in rear of fus around tailplane mount planking
- Big dent in the A10 teeth on starboard side on the nose, gun and associated hardware torn off
- ply former at torn in half at (new!) tensioner device
- mating phenolic tube (port side) dislodged / pushed forward (no idea how that happened)
- nose weight made a bid for freedom through the (admittedly thin) cockpit floor, but was ably stopped by the full-length carbon alignment tube
And that's it. I'd estimate 40 hours work to put right, and I have 6 weeks, so should be easily do-able.
So what's the plan? Put everything right listed above, with a couple of improvements :
- Move the C of G back to the 5% stability line (equates to about another 20mm back)
- Seal (tape) all control surfaces from the underside, to make the most of low-speed efficiency
- Attempt to add a centre-line / C of G area launching handle, within the fuselage, to allow a single (brave, poor) soul to launch single-handedly
- Add "launch" setting for entire TE, dropping maybe 5 or 6mm if the wind is mediocre
- Investigate use of a moving sealing plate to eradicate the huge groove left in the wing's bottom surface when the flaps are at 0 deg.
- Local reinforcements to fus split-line formers & tailplane dowel former; new spruce spar for tailplane; heavy duty cockpit floor in ballast area
I hope all this should end up with the aircraft at least weight neutral, if not actually loosing a pound or two.
More when it happens!
Monday, 3 August 2015
A10 final check ups..
Well, I think she's ready.
I moved the C of G back around about 30mm - it just looked so excessively forward, I was very worried. Checking this through using online calculators, my fears were substantiated. All that lead that I put into the nose has been reduced by a quarter, and the CoG now sits just behind the main spar (160mm from root LE) at 10% stability, which I know from experience of using that same calculator is still quite conservative.
I've made up a set of silver foil bags for all the parts, so she shouldn't get battered around in transport any more! I also did some weathering and added panel lines. Short of a full charge for the batteries again, that's it - flight ready.


Yes OK another bloody PSS machine!
On the second day of a lovely 4 day walking holiday, I received an email about a PSS B52 that had come up for sale. Needless to say, I snapped the seller's hand off! I picked it up this weekend, and what a beauty it is. Built to Simon Cocker's plan very nicely, I didn't have much to do to it other than program it into the radio, change the flight battery, and tidy up some covering.

Time for a few bomb runs on the Lleyn this weekend!

Subscribe to:
Posts (Atom)