Friday 18 December 2015

C17 Pylons #2

Well, I don't know what happened there, but my source plan was WAY out when it came to the pylon shape.  I have remodelled them to the correct shape, and adjusted the position of the engines.
I also re-did some of the formers around the fuselage join, after learning some lessons on the A10 in this area.  The top of the fuselage in this area will be for the receiver and it's switches, and also access to the tensioner for the fuselage join.


Wednesday 16 December 2015

Building board changes

After hearing so much about using plaster-board to build on, I got a 5 foot x 3 foot panel from B&Q last night (only £6!).  This coincided with a big bench clean up, as I had visited the venerable Matt Jones on Sunday to pick up some large white foam panels for the C17.

To say that his workspace is neat and clean is an understatement!  So here is my attempt :


Looks ok I think, and nice and flat.  So, one thing to do - get the Sea Hawk on it!  Pinned down and levelled-up :

Tuesday 15 December 2015

C17 pylons

I modelled up a generic pylon that should suit both inner and outer stations.  These will have to be really stiff, as I will make them permanently mounted to the wings, then the engines will be magnetized to the pylons.  I think perhaps 1/8" ply either side of a 5/8" balsa core.


Then here is a frontal view for a bit of model porn!

Monday 14 December 2015

C17 Engines etc..

Today's progress covers the fin-top area, and the engines.  These will each be 3D printed from 3 pieces, then joined together to produce the shape seen here.

The fin-top will be quite a structural piece, joining the one-piece tailplane to the top of the fin via 2 steel socket cap head screws and 2 dowels for location.

Thursday 10 December 2015

Back to the Sea Hawk..

So, the Flanker is sat there ready for glassing, and I have everything around me to get on with it.  I just can't be bothered as yet, as I really do have a LOT of time before the PSSA events commence, even if I do go flying in January / February, I can still get her done for then.

Anyway, on with the Sea Hawk.  I've now made a lovely little planked boat!


I sealed off the underside last night, and decided to crack on with the arrangements in through the top.  First of which is the elevator and rudder controls.  Yes a rudder.  If you fly without a rudder on a aeroplane that was meant to have one, you should be shot.


Not much going on in that shot, but it's interesting to see how curvy she is for something with such a small span.  So, I have started to prepare a bowden cable for the elevator, and haven't really thought about rudder control as yet.  Probably bowden again, as I have lots of it around the workshop.


Gratuitous plan shot!  Yes I still keep a Sea Hawk plan on the wall for me to sketch notes and modifications on to, in case I make another.  Ooh - B24 fuselage photo bomb there on the right!

Tuesday 8 December 2015

C17 modelling, part 2

Here's a picture of some former tweaks that I've been working on tonight.  Some more reinforcement around the landing gear pods (to be used for launching and..well...landing on).


C17 mass build!

OK, not quite a mass build (thankfully!) but no sooner had I posted my intention and a picture of the design onto Facebook, a fellow PSS'er jumped in to say could I cut him a set of formers and a wing.

I will get my first one a little way into the build to iron out prototype problems first though, then cut him all the bits.  The builder of said 2nd C17 - David Gilder.  Nice one Dave!

Friday 4 December 2015

2016 builds - final version.

OK so this is what I am planning my building time on for next year...with a surprise..

  • Finish the Flanker - just needs tailcones sorting, then glass and spray.  4 weeks work.
  • Finish the Sea Hawk - cut wings, finish fuz planking, make tail set. Glass and spray.  5 weeks work.
  • Build 3x L59 (or L39? can never remember) for sales. 3 weeks work.
  • Build Folland Gnat. 6 weeks work.
  • Build a new project that I've been designing this week.  15 weeks work.

So that new project then. Meet the Big Grey Cloud :


Yes, a 3.4m wingspan, 3.3m long, 1/15th scale C17 Globemaster.
It will be a "quick and cheap" structure - cheap 4mm ply for the formers and crutches, blocked out with white foam then carved to shape.  Finished with brown paper and PVA, glassed where necessary, and blue foam in the nose and front of undercarriage pods probably.  

I will cut the wings and veneer them myself as usual, and they will be covered with with Solarfilm or brown paper.  I will 3D print the engines to make them light, cheap, and strong, and I might 3D print the winglets too.

I plan on splitting the fuselage just behind the wing root, and the tailplane (all 1500mm of it!) will also be removable.  The main wing spar will be 25mm square steel, as per the A10 - its way over-specced, but cheap and easy to use.  I may splash out on proper FighterAces wing joiners for the fuselage joint again, unless I find anything suitable in the mean time.

Here is my model, with an (odd) human alongside for scale :


Aint she pretty?!  Work will start in January, with an aim to getting it done for the first PSSA meet, but definitely ready for the second.


Wednesday 2 December 2015

Flanker balsa bashing done

I did the intake blanks last night, so that's it - nothing more to cut.  I started this on the 18th of October, so not too bad - 6 weeks of building to get to the glassing stage.  Now..Ronseal (aka PolyC) or epoxy?

Not sure on that, I have consulted The Elders. Hehe.

Tuesday 1 December 2015

Flanker bits

OK enough ranting.  I think I don't have any balsa left to cut for the Flanker.  Here are the ailerons taped-on, with the tailset mounted too.  All the wiggly bits had a final sanding last night, and hinge points added ready for when the primer is on.

The wing tips have had the 1/16th inch ply end plates added to stiffen things up, and also hold the removable missile rails.


Fus is now 95% sanded.  Balls - just remembered that I have to finish off the area around the intakes.  Blanking, and a bit of tweaking on the separation to the underside, and then that's it for balsa bashing.

Probably.


First post for December - soapbox edition

Welcome to December!  This year has gone quick, but it was just over a year ago (by two weeks) that I picked up a pile of formers, a carbon tube, some plastic bits and a set of foam wings for an amount of cash that has previously bought me a Pike WR (with servos)!

Doesn't seem fair really, as the Pike has - and will - get a lot more air time than the Hog ever will, but then F3F-shaped aircraft are two-a-penny.  Actually probably more like 4-a-penny.  They all look the same to me - elliptical tips / skinny fuselage / vee-tail.  It really does look like they all came from the same mold, and if they were all the same colour, I bet most people would struggle to tell the difference between any of them.  To me, the only one that stands out is the old Elita.  I'd seen one once, and loved it - such a refreshing shape with that keel under the fus.

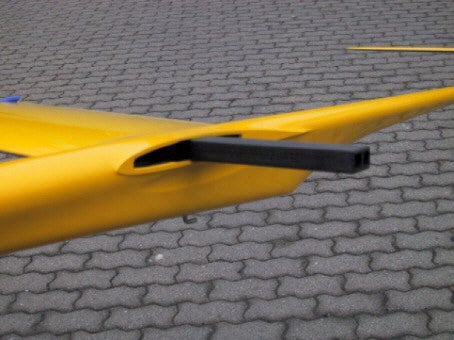
I'm feeling suddenly nostalgic.  Here is a picture of the keel area of an Elita.

And a pic from KNewt's site.  Oh look, a cruciform tail.
(If anyone has one for sale, or wants to swap for a Pike WR (carbon fus / carbon d-box), I am interested)

Yes they all look the same, and yes, fliers of the type tend to just fly fast looping circuits in front of themselves ALL DAMN DAY ("I'm practicing" - for what? being a boring knob?), but these aircraft really do instil confidence when you chuck them off the edge in ANY sort of wind.  They will just work, and work very well. Obviously capable, but just so boring.

Which makes the price of a Hog (I stopped adding up the column on the spreadsheet when I got over £850..before it was painted) sort-of-worth it.  Yes, it needs specific conditions, but bejasus - it has character and presence, something another moulded clone will always fail to have.

And if someone asks me again "why don't you just put turbines in it", I will stick the nose section up their arse, blunt end first.


Monday 30 November 2015

M55 design study

Here is a picture of an M55 Mystic, along with a 3-view that I have used :


I'm not too keen on that particular colour scheme, but hey ho.  So, here you can see the quite large wing area that the Mystic affords the RC pilot, and also the anhedral.  Apparently, as the 'plane starts to fly, the wings load up and become "level" in the air.  I'm not sure how that works when  there is a tailplane between the booms up there, but anyway - I won't be including the anhedral.

Here is my first sizing sketch from 3D CAD : 

I stretched the span slightly, and increased the chord of the wingtip a wee bit too (because I'm like that - always have to fiddle!) and a 3m-ish wingspan.  This equates to 1287.2 sq inches / 9 sq feet (yes, jumping units here, you'll see why), and if I wanted 15oz sq ft ( this is why - I have no idea on loadings in deci-metre squared), the aircraft would have to be 8.4lbs in weight.

I think that's fairly do-able.  A nice glider-ish power ratio would be 80W per lb (at the top-end - I want this to get away from a solo hand launch on the flat too) gives me just under 700 watts of power - easily achievable.  

The next step then is to think of what that means in battery size and weight.  I haven't got anything 4S lipo powered yet, but I feel this would be best here for a big prop pushing from where the jet exhaust area is. So 700 / 14.8 (I=P/V) gives me a current at WOT of 47amps.  Nice.  

Want it stay up long?  Then let look at some BIG batteries.  A Zippy 5800mAh battery comes in at 20 ounces of our 134oz AUW, and a decent 850kv motor comes in at 5oz.  That leaves a lot of headroom for 8 servos, a flight battery, and the airframe.


Friday 27 November 2015

Flanker cockpit area

Well, in between waiting for filler to dry, I have been working on the cockpit.  I carved this up from my favourite pink foam last night :


And I fired up the 3D printer at lunch time, after downloading these guys from Thingiverse :


So she's progressing well.  I should be nearing final sanding this weekend, then it will be glass > prime > fit cockpit innards > fit cockpit > red spot putty > top coat.

Can't wait to see her in the sky now!

Thursday 26 November 2015

Possible Flanker colour scheme

I found this whilst browsing through tumblr - I quite like it!


I think it may be at the top of the list if I can find an underside view of it.
OK had a quick Google, found some!


Wednesday 25 November 2015

Build and future project musings...again!

Well, here I am again wondering what will end up on the building board next.  I have a couple of refits to finish (F4 and Hunter), as well as the Flanker and the Sea Hawk (both coming along great) - so should I stop there?  Of course there is a 1/12th scale B24 that I really want to get airborne too, but as mentioned before, I'm not sure if that will end up PSS just yet.

As it's the PSSA's 30th anniversary next year, I wanted to get either an Alan Hulme Gnat, or the mass build Skyhawk built too in the new year - maybe both?

Then I still want to build something "EPSS" to cope with those times there isn't any wind blowing, so maybe I should concentrate on that before the season gets going? I am pretty sure that will end up a 3 metre span M55 Mystic - I intend to start the drawing of that today.

Then what happens to my other bits and pieces I really wanted to get done?  Perhaps I should move the 6th scale Me262 back to 2017, along with the Sukhoi PAK FA T50 and the large scale B36D.

So yesterday to make even more confusion, I drew up a 2.5m long / 2.1 m span B1 Lancer, that really gets the juices flowing :


Ugh.  I need to retire soon so I can get all this building done!

I will get plans drawn up for everything and then worry about it once I have the Flanker and Sea Hawk done.  I will upload some M55 pictures soon as I progress.

Tuesday 24 November 2015

Flanker plastic parts

Here are some images of the first of the plastic parts going onto the Flanker.  The nose section I was quite worried about - it needed packing to obtain the correct angle but I still wasn't all that sure until the epoxy set.  Anyway, I am happy with the way it turned out, and so I filled the join with car body filler.  I have a bit more to do there to blend it, but it's coming along.


Now a general overview of the pink foam bulges under the wing roots.  One side is sanded fairly well, the other yet to be filled or carved.  I think I will blank off the intakes as per Matt's version.  It seemed to help a bit on my Fulcrum when pulling up hard, she bleeds off less speed with these blanked.


I have blocked out and carved the underside of the bee-sting now too.  Oh, it's been filled and sanded smooth all over since then!

A view from the rear - nice shape!


And now the other plastic bits - the exhaust nozzles.  I know Matt built his up, but I have tried rolling 1/64th ply nozzles in the past, and they ended up pants, so I am happy to use these.  Afterburners will be installed later, after glassing and spraying.

Not many tasks left here now :
  • Build up cockpit interior, shape cockpit
  • Fit wing-tips and make tip rocket rails
  • Create and shape ailerons, prefit hinges and function test
After that its final sand then time for glass!


Sunday 22 November 2015

Some tweaked images

Here are a couple more tweaked images of the A10's flying.  Done by me for once!


Thursday 19 November 2015

F104 flight

I forgot to add this - the pictures from the F104's first flight as a slope soarer.  She went quite well, but maybe it was a bit gusty for her.

Anyway, some pictures :


Tuesday 17 November 2015

PSS A10 Thunderbolt II - 1/6th scale

She flies!  And very nicely too.  A great day's soaring saw me get the A10 and the new F104 maidened.  I am very very happy!