Friday 29 April 2016

C17 Globemaster III - wing and spar work

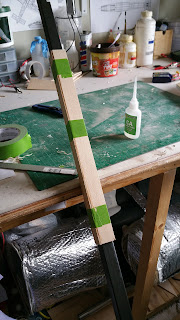
This is something I did on the A10, and I quite enjoyed it there - spar boxes from liteply.  The steel is 25mm square, and the liteply is 3mm thick, so I cut four lengths at 28mm wide.  These are then taped around the steel used as a former.
Cyano is run down the exposed edges, then given a hit of kicker.  Wait a few seconds then pull it off the spar, where you can then run cyano up the inside corners, from both ends, then hit again with kicker.  Job's a good 'un.

The first of these boxes is then glued into the nose section of the fuselage, and webs added for stiffness, after checking everything is level of course.

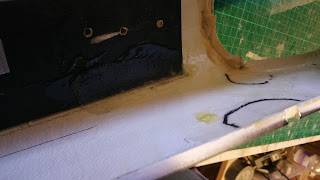
I then went back to the wings and removed the foam for the double-servo bay, and inserted a liteply base for mounting them.

A quick test fit, then I added balsa around the bay to fully board it out.

I now need to add the LE and TE (both will now be pine), add the tube for wiring access behind the TE, add the root faces to the fuselage, then I can add the spar boxes to the wings and close up their end-faces.  After that it will be flap canoes and setting all of their linkages up, along with the spoiler and its hinging.

Phew!


Thursday 28 April 2016

C17 Globemaster III - wing bits

I started off boarding the bottom of the spoiler bay with medium 1/8" balsa, then added a 1/4" square spruce "spar" across the front edge.  I let the spar in under the veneer, and wedged it in with scrap balsa.  There is a gap of white foam - this will be divided into two servo bays.  To close things off, I used some of the balsa to cap each end of the bay too.

 As the gorilla glue started to foam, the veneer lifted slightly, so I quickly cleared up the other bench a bit and weighted everything down.  It's all good this morning.

In this image you can see one of the slight "ripples" in the top surface veneer - this will be dealt with top and bottom, shortly.

Remember I mentioned the flap size?  Here is one with a standard sized retract servo placed on top for comparison.
Big!
A delivery of various carbon tubes has arrived now too - these will form the inners and outers of the fuselage joiners.

I even tidied the bench! Yes this is tidy.
A long weekend coming up, so I hope to get lots of building in!


Wednesday 27 April 2016

C17 Globemaster III - wing work

Right then - some serious cuts to make into this wing!

I have removed the flaps and ailerons, faced up the former and put the latter aside for some hinge development work - I will get some pics of them done soon.

The next big thing to work on is the spoilers.  Fetch me a knife!

No going back now..
I cut the perimeter with a scalpel, then sliced the skin off with a retracting blade.  In this pic you can see the two servo positions - they will be right next to each other here.  Flap servo on the right, with its control rod passing down into canoe 2, and the spoiler servo on the left.  Both will be lying flat in this space, and also both accessible with the spoiler in the "up" position.  I may make a hatch for the flap servo and just leave the spoiler servo exposed.  Or not.  I'm not sure yet.

Topless!
Well that went well.  The foam was well bonded to the veneer, so I'm happy with the gorilla glue approach still.

Is it getting hot in here?
I shaped up some wire to cut a 12mm deep slot in this foam, with guides to run on the veneer.  This was put into my old Hilka soldering gun, which is mostly knackered.

Slot city
Aaaaannd...done.  This will get boarded-out with 3mm medium balsa, and I may insert a hard spruce spar at the front to resist bending.  The spoiler itself's construction is still yet to be decided on.  I think it will be a composite of 3mm balsa top - glass core - 2mm balsa bottom.


Monday 25 April 2016

C17 Globemaster III - the build continues

So, after the rush to get things ready for the first PSSA meet of the year out of the way, it's time to get back to some serious building.  I went back to the rear fuselage this weekend as I had started to block out with foam previously, and stopped due to a few problems.

The biggest problem was the general "floppiness" of the assembly.  The 4mm ply has no great torsional stiffness, and the fin has quite a moment arm against it.  When trying to man-handle the fuselage, this causes all sorts of problems, and I could tell straight away that things were not going to be built straight or level (not exactly uncommon for one of my builds!).

So, I built a building jig :

The tailplane is bolted to the thick ply base through its tailplane mounting holes (2 off M5), and the front former is then held up square and to the right height by the wood at the front.  Job's a good 'un.

Now onto the wings :
Razor saw included for scale.  This is the underside of the port wing, and the flap canoes are laid out in their respective positions.  The thick black lines are the engine pylon mounting datums.

Happy with all that, I rolled the wing over to start marking up face cuts for the flaps and ailerons.

At that point I thought it best to go to bed and have a good sleep before committing scalpel to wood.

MB339 repairs - part 3

After a good rub down, the fuselage was hit with some primer last night.  I'm very happy with the filler repairs, as you can't see the joins at all.  There was some paint reaction unfortunately (the end of one primer can) so I will give that a tickle with fine paper and shoot those areas again.   Nearly done!


Friday 22 April 2016

MB339 repairs - part 2

So, everything is dry today, and the fuselage is nice and stiff.  I should have weighed the assembly before and after see what the weight gain was, but I forgot.  Ah well - PSS'ers fly better when they are heavy anyway.  I good sanding session on the spot-putty ensued this afternoon.


More ridges gone, and a quick clean up in the second image.  I am set for the P38 tonight application tonight, then it will be a bit of finish sanding along with wet & dry tomorrow, hopefully some primer by Sunday.


Thursday 21 April 2016

MB339 Repairs

Dave Gilder unfortunately crashed this last year at the Lleyn PSSA meet - I think it was down to a rear-ward CofG.  I feel a bit responsible for the aircraft's demise, as I egged him on so much to give a try in the lift.  Sorry Dave.

Anyway, as penance I pestered him to let me repair the fuselage (where's the wings Dave?!), as I actually quite enjoy glassfibre repairs.  Here's what I did.

First off, all cracks identified, then thin cyano run into them.


A few squirts of kicker stops the cyano running, and helps the assembly stay a little more stable.  10 minutes later, and she feels quite stiff already.  A quick sand with fine paper pushes some glass and dust into the cracks - these are then hit with cyano and kicker again.  It acts like a "natural" filler and bonds the fibres together a bit more deep in the layers.

Next up, run around with a black marker and identify the crack areas from the inside.  This allows me to make sure I haven't missed anything, and also size the glass for the interior repairs.


Patchy!  Next up, my favourite multi-purpose laminating / finishing resin - Gurite SP106, and some heavy duty cloth I've for ages.  I think it was 50 metres on there.  I'm still not halfway through it after about 15 years.

Choppy choppy!  These are all the patches laid out in sequence.

Time for some music and epoxy mixing!
Oh, I removed this rear strake as I need to make a copy for the other side (I assume its on a Welsh hill) plus it makes it easier to turn the fus over.

About 15 minutes later, the patches are in.


You can see some wetness, but trust me - all epoxied in.  I use a wide soft disposable brush to apply, and stipple it in.  Job's a good 'un.

Then whilst that's drying, I moved to the outside for the only really stinky bit - 3M glazing putty.  This is essentially thick paint and is pushed into all the ridges on the outside that aren't too deep.  The big ones will get P38-type body filler as the red stuff shrinks too much as it dries for deep holes.  I masked off an area here to protect some Arabic text that looked like an expensive decal that I didn't want to hurt.

A quick rub down tomorrow, and I will then mix some P38 - I need some for the Vulcan anyways,  After that's dry, its time for some masking and a hit of primer.  Until next time!


A10 - last of the repairs

I had a good chat with Phyilis Cooke about the structure, and we came to a decision on what to do.  If the hook was to be attached with a beefed up former, then stresses would congregate elsewhere, deeper in the fuselage structure.  If I mounted the hook with a break-away two nylon bolt system, it may fail in flight, though I would dispute that there are no real aerodynamic forces that would cause that - this will be my fall back position if it fails again, which brings me to the used solution :

Just glue it back on!  Lots of epoxy on the back, and the two screws utilised again to hold it all whilst it dries.  Sure, the former may get pulled apart even more next time, in which case I can re-manufacture it's front face, and install a weak-joing for over-stress situations.  Perhaps be a bit more careful in my landings next time, eh?!

I just have to cyano the hatch-mount block back on, and she's cleared for flight again.

Wednesday 20 April 2016

A10 post-landing repairs

After my slightly donked landing, the A10 needed a little fettle in the rear fuselage section.  Here is what I did :
The top part of the skin there popped out of the former, as did the bottom corner where the second clamp is.  Thickened epoxy was pushed into all the joints, then the clamps were applied over masking tape (stops runs) for a couple of hours (it's 30 minute epoxy).  All seems good and solid now.

This is the worst bit, where the rear tension hook pulled its mount off the former - ouch!  Now - should I double this and reinforce, or leave it as a weak joint? It probably helped avoid a more serious crack somewhere else, so was happy the energy was expended here.  Hmmm..will have to think on this one.


Tuesday 19 April 2016

A10 "medium" wind success

On the Sunday after our recent PSSA meet, I went back up to the Orme, as the wind forecast was a lot better than what we had on the actual event days.  I'm glad I did!

I met up with Tim Mackey, who bravely agreed to be my launcher (many thanks Tim!) and I set about rigging the big beast.  I actually prefer rigging the A10 now than the B52, which is a pain in the arse with the amount of wiring she now runs, along with the rusty rods that hold the tail on.

All the bits ready to bolt together


I digress.  In no time at all the Hog was air-ready, and Tim had been sampling the big air with his Vulcan to great effect.  A quick reading on the Vavuud showed an average of 28mph with 33mp gusts - a fair way off her maiden winds that were 51mph gusting 60!

I decided to go for it, as at least launching from the top gave me a "get-out" on the lower shelf, one of the SW bowl's best features.  With a grunt and a good dollop of nose-down attitude from Tim, she was away cleanly and climbing very well.

A steady climb-out
I tried my thermal flap setting, that I've changed to a variable volume on one of the 10C's VR knobs, and with a few degrees of down flap, she would again start to climb with the nose into wind, pretty much doubling her height in 20 seconds or so. 

Steady flier
I passed Tim the TX and he had a few minutes with her in a steady fashion - after all, he flies the opposite TX mode to me.  We saw a curtain of rain coming in across the sea, and so after about 20 minutes flying, I called a landing.  

In the groove
I flew a RH circuit but was (for a change!) a bit far back so she donked into some deep heather with one wing slightly too low - this spun the nose round quick and cracked the nose retention hook off it's mounting internally, and popped the skin seam around the join.  Nothing major, but enough to stop her going out again.

Splat! Still in motion at this point..
She will live to fight another day, with only 2 hours' or so of workshop time needed to get ready for more slope-side missions.  Each flight is a learning experience for me and heavy models, so once she is fine-tuned (and the pilot too!), I will re-finish her paint job ready for the other two Hogs to fly alongside.

A great outing that was well worth the stick time, I then went on to have 2 or 3 more flights with the Hawk, dodging rain showers as they came through.  Now I know she can fly in winds in the high 20's, I'd be happy to have her chucked off in, say, a 25mph with a touch of flap.  More wind speeds = more Hog Air Time, which has to be good!


Rock on!


Su27 Flanker - tailplane rod improvements

During a successful PSSA meet on the Great Orme this past weekend, I (or rather Bramble) managed to break the carbon fibre rod on the RH tailplane unit.  Ah well, it's a quick repair.  Then I remembered what I had done - I'd ordered 4mm tube AND rod at the same time, and in my hurry to build the aircraft used the tube instead of the solid rod.  I had reinforced the area where the actuator screws on, but it was only very local, so out it came.

Thankfully I still had the rod spare, so thinking that I had one failure I might as well pop them both out and do them in one shot.  

A little bit of knife-work, and the old ones were soon replaced in a bed of thickened epoxy with the new rods.  I used masking tape to ensure the surface stayed smooth, so  a quick wipe of filler will see her ready for top coat again.  Easy job!

Monday 11 April 2016

Glider transportation - trailer to slope

I thought about using a golf-cart for this job, but then found these on Amazon :

I love it!  The roof is removable, and the whole thing packs down to fit in the van or trailer.  I might upgrade those wheels to something with air in at some point, but this will definitely help taking models across some of the fields and footpaths when yomping bloody great big airframes.  Trust me, a 40lb A10 hurts your back, and a 1/4 scale ASK18 is ungainly.

I might even let Shona use it in the garden!

Su27 Flanker PSS - finished!

As I was on my own all weekend, I took the opportunity to finished off the Flanker.  A bit of spraying / panel lines / decals / lacquer, and here she is.


I'm quite happy with that, although I had / have two problems.  The dark blue is too dark, and my 3M vinyl masking tape is too wide to make the more complex curves found on the full size "Blue 69".  But, it's only a paint job and those can always be changed if it annoys me too much.  

I had what was probably my most successful hinging session on this Flanker too.  Lot of preparation never goes amiss, and always dry fit things a few times to make sure you know where to push and by how much.  I also masked off the joints to stop grubby, epoxy-laden fingerprints getting all over the fresh paint job.


Right, she's balanced now, and I only have a couple of small jobs to kill off before next weekend's PSSA meet - the intakes need painting black, and the fins require the front location dowel to be added.  

Pray for wind!